Friday 25 November 2016

How to Configure Digiflip wifi router for Tikona for DHCP

CONFGURE DIGIFLIP ROUTER WITH DHCP FOR TIKONA
Dynamic Host Configuration Protocol (DHCP) is a client/server protocol that automatically provides an Internet Protocol (IP) host with its IP address and other related configuration information such as the subnet mask and default gateway.
(thanks to google)
What is the benefit of using DHCP mode in Tikona with your wifi router ?
Tikona allows only 2 concurrent sessions. so if you want to use more than 2 devices with your Tikona connection, DHCP can be helpful.
  1. Open Digiflip router page by typing 192.168.1.1 in the address bar of the browser
  2. Default login/password is admin/admin
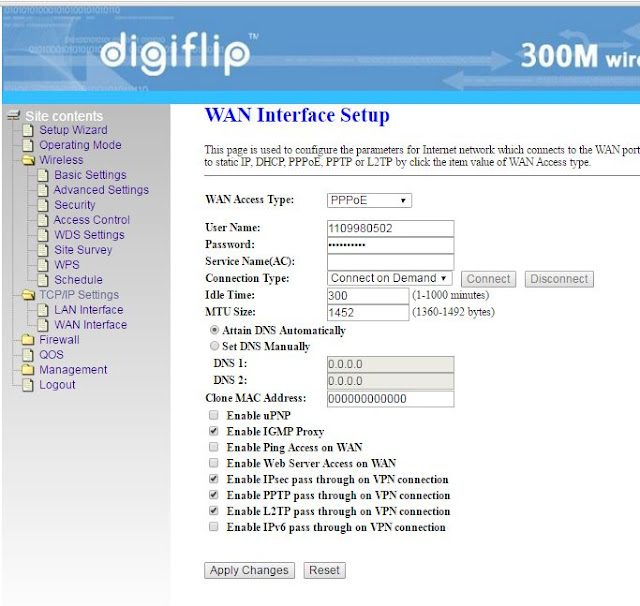
  3. Open WAN Interface setup screen
  4. Fill the Details as shown in the above screen and Click on Apply changes

Sunday 8 May 2016

Digiflip WR001 Log details

Here i will explain about the logs captured by Digiflip WR001 300 mbps wifi router and how to interpret the logs.

First of all, to view the logs, you need to login on the wifi router home page.

Login URL for digiflip : http://192.168.1.1/home.htm

Default Login Id : admin
Default Password : admin

On the left side menu bar, navigate to
Site Contents
 - Management
   - Log

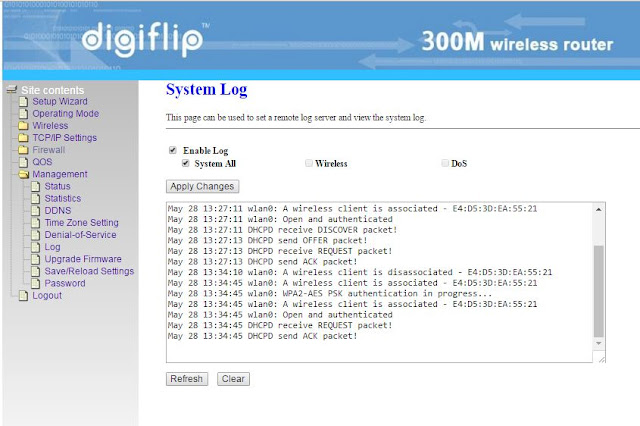
Here you can see the log related settings.
In case enable logs option is unchecked then you will not be able to see any log details.


Mar 28 06:27:22 wlan0: WPA2-AES PSK authentication in progress...
Mar 28 06:27:22 wlan0: A wireless client is associated - E4:D5:XX:XX:XX:XX
Mar 28 06:27:22 wlan0: Open and authenticated
Mar 28 06:27:22 DHCPD receive DISCOVER packet!
Mar 28 06:27:24 DHCPD send OFFER packet!
Mar 28 06:27:24 DHCPD receive REQUEST packet!
Mar 28 06:27:24 DHCPD send ACK packet!
Mar 28 06:37:12 wlan0: A wireless client is associated - E4:D5:XX:XX:XX:XX
Mar 28 06:37:12 wlan0: WPA2-AES PSK authentication in progress...
Mar 28 06:37:12 wlan0: A wireless client is associated - E4:D5:XX:XX:XX:XX
Mar 28 06:37:12 wlan0: Open and authenticated
Mar 28 06:37:12 DHCPD receive REQUEST packet!
Mar 28 06:37:12 DHCPD send NAK packet!
Mar 28 06:37:13 DHCPD receive DISCOVER packet!
Mar 28 06:37:15 DHCPD send OFFER packet!
Mar 28 06:37:15 DHCPD receive REQUEST packet!
Mar 28 06:37:15 DHCPD send ACK packet!
Mar 28 06:44:17 wlan0: A wireless client is deauthenticated - E4:D5:XX:XX:XX:XX

Tuesday 22 March 2016

Digiflip WR001 Tikona working configuration setup snapshots


Open your browser and enter 192.168.1.1 in the URL
Default login details are follows:
Login id : admin
Pasword : admin

If you are using PPPoE for connecting to your Internet Service Provider (ISP) then the below configuration details for digiflip wr001 wifi router should match.

Page by Page settings are as follows

1. Operating Mode
Gateway option should be selected
Digiflip,Tikona,WR001

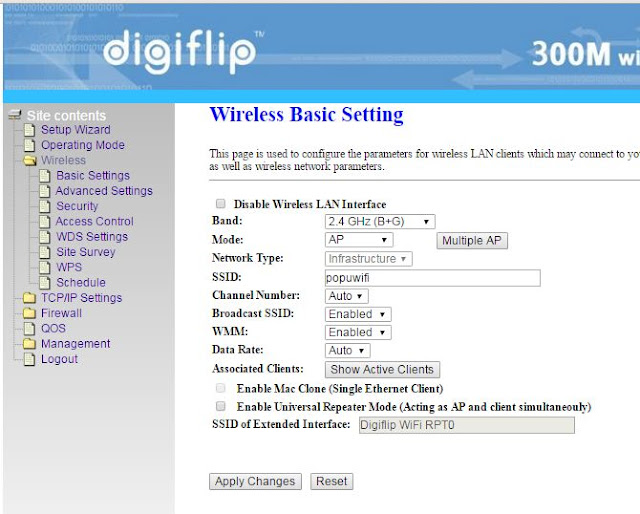
2. Wireless Basic Setting
Key point to be noted here is Band should be 2.4 GHz  (B+G)
Set any name in SSID, this will be the name of the wifi network when you scan for connection.
Digiflip,Tikona,WR001

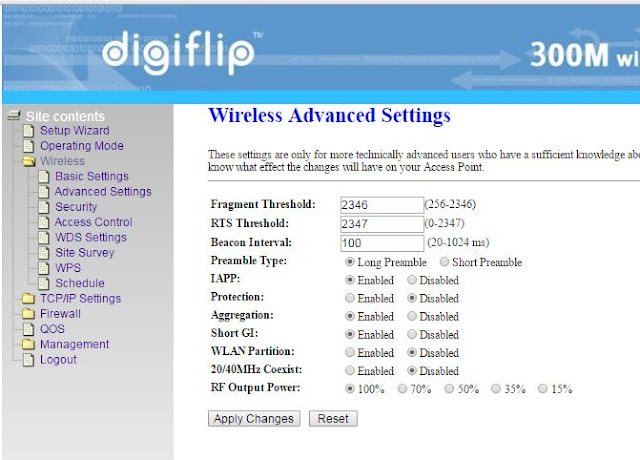
3. Wireless Advanced Settings
Do not modified any of the values in this page unless you have instruction from you ISP (example TIKONA)
Digiflip,Tikona,WR001

4. Wireless Security Setup
Pre-Shared key is the password which should be entered when connecting to the wifi network.
Digiflip,Tikona,WR001

5. Wireless Access Control
No need to configure this section unless you have your wifi password compromised or there is severe security threat to your wifi network.
Digiflip,Tikona,WR001

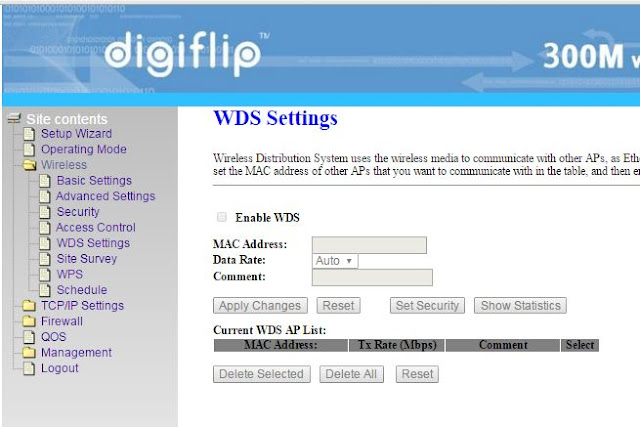
6. WDS Settings
If you are using Digiflip as your primary router no need to configure WDS settings.

Digiflip,Tikona,WR001
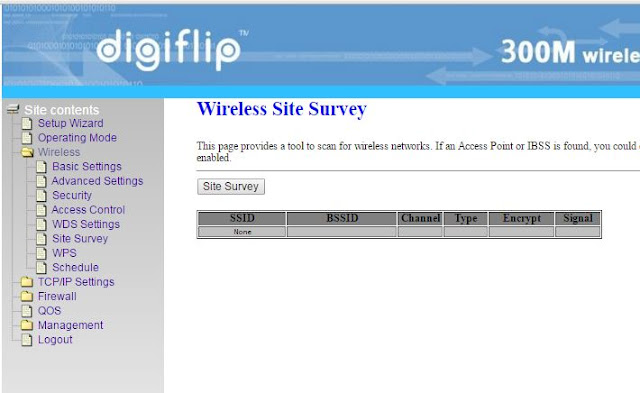
7. Wireless Site Survey
Click on Site Survey to view list of all the wifi networks available nearby.
This info is useful in understanding the amount network interference possible with your router.

Digiflip,Tikona,WR001

8. Wifi Protected Setup
Select Disable WPS

Digiflip,Tikona,WR001

9. Wireless Schedule
Configure the start time and end time of wifi internet availability from this page.
This would be usefull if you want to control the network availability and want to provide a time limited connectivity.

Digiflip,Tikona,WR001
10. LAN Interface Setup
You router acts as a DHCP server and will provide IP address to your devices which will be connected to the router.
Although your ISP(tikona) may provide only one IP address to the router, you router will provide different IP addresses to your devices.

Digiflip,Tikona,WR001
11. WAN Interface Setup
Most import configuration page. Tikona internet service provides DHCP & PPPoE access.
In DIGIFLIP WR001 router, DHCP does not works for tikona. For Tikona please select PPPoE
and enter you tikona login id in User Name and tikona password in Password field.

For Tikona if you select PPPoE, you do not need to login again from your device.
Your router will login and you can directly access the internet when to connect to your router.
Big Problem of bypassing the tikona login will be resolved.

Also Tikona restricts the number to devices to 2 which can be connected at a time.
With this configuration you can connect any number to devices.

Digiflip,Tikona,WR001
12. Port Filtering
Add port numbers if you want to restrict

Digiflip,Tikona,WR001

13. IP Filtering
Add IP address which you want to filter.
Digiflip,Tikona,WR001
14. MAC Filtering
Digiflip,Tikona,WR001

15. Port Forwarding
Digiflip,Tikona,WR001
16.  URL Filtering

Digiflip,Tikona,WR001
17. DMZ (Demilitarized Zone)

Digiflip,Tikona,WR001
18. VLAN Settings

Digiflip,Tikona,WR001
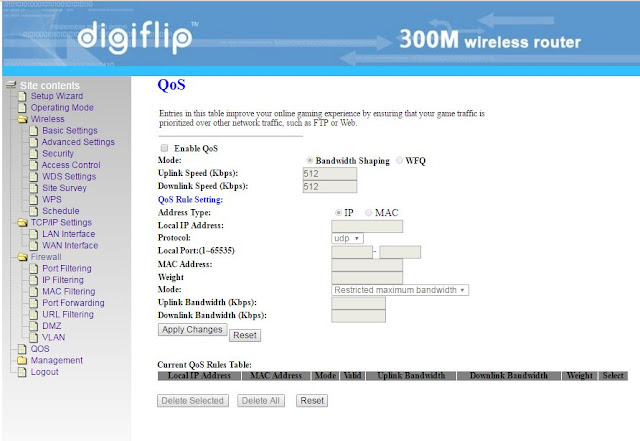
19. QoS (Gaming)

Digiflip,Tikona,WR001
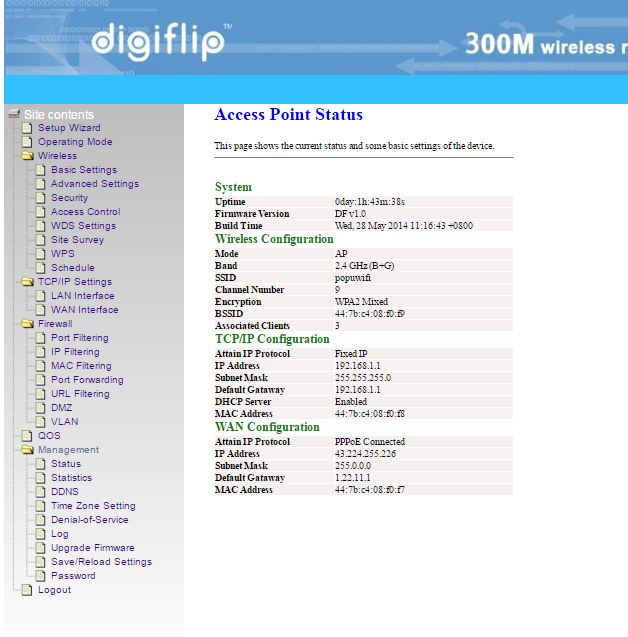
20. Access Point Status

Digiflip,Tikona,WR001
21. Statistics

Digiflip,Tikona,WR001
22. Dynamic DNS

Digiflip,Tikona,WR001

23. Time Zone Settings
Digiflip,Tikona,WR001
24. Denial of Service

Digiflip,Tikona,WR001
25. System Log

Digiflip,Tikona,WR001
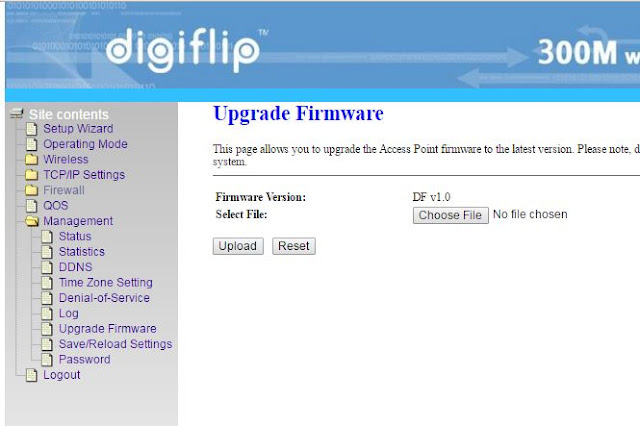
26. Upgade Firmware
Digiflip,Tikona,WR001

Monday 21 March 2016

Digiflip WR001 router connection & Configuration. Bypass tikona login page.

Digiflip,Tikona,WR001
Digiflip WR001 300 mbps router backview is shown in the above image.
First four are LAN port and the fifth port is a WAN port.

Cable from your ISP(internet service provider) e.g Tikona should be connected in the WAN port of the router.

Connect one end of LAN cable in any of the LAN ports of the router and other end to your PC/Laptop

Open your browser(IE/Chrome/Firefox/etc) and type the below in the URL.
Router administration page : 192.168.1.1

Digiflip,Tikona,WR001
Enter the details as follows :
User Name : admin
Password : admin

1. Setup Wizard page will be displayed. Click on Next button.
Digiflip,Tikona,WR001


2. Select Operation Mode as "Gateway" and click on next button.
Digiflip,Tikona,WR001
3. Set the LAN interface details as follows and click on next button:
Digiflip,Tikona,WR001

4. In WAN interface setup screen, select WAN access type as "PPPoE"
enter your tikona user id in User Name and tikona password in the password field
Digiflip,Tikona,WR001

5. In wireless 2.4GHz basic settings screen, select BAND as 2.4GHz(B+G)
Digiflip,Tikona,WR001

6. Wireless 2.4G Security Setup
Digiflip,Tikona,WR001

7. Click on Finished button. This will restart the router.
8. In the management menu on the left hand side, click on Status.
This will display all the details. In WAN configuration section, Attain IP Protocol should display as "PPPoE connected".
Digiflip,Tikona,WR001

9. In case the status does not shows connected, Please contact the Tikona Router team and ask them to activate PPPoE on your account.

Router support Team Tikona : 02267357878